Factory Reset Protection or FRP, is a security feature in Android devices which prevents misuse of the factory reset option. This feature protects your device or data in case the device gets stolen or lost. It becomes a problem if you bought a secondhand Samsung device and the previous owner didn’t factory reset it. If you try to factory reset it without knowing the Google account credentials, it will be FRP locked.
The best option would be to contact the ex-owner, but if it is not possible, Dr.Fone – Screen Unlock (Android) can solve your dilemma. It is the best tool to perform FRP bypassing Samsung devices, unlocking it fully so you can use it without worries.
Part 1: What Makes Dr.Fone – Screen Unlock (Android) Best among Its Competitors
For any Android lock screen removal tool to be considered the best in the market, it must have a high success rate, an easy interface, great speed, and optimal security. Dr.Fone – Screen Unlock (Android) excels in all the qualities mentioned above and offers much more. It can work in a wide range of scenarios and bypass FRP on your Samsung device in a matter of minutes.

After unlocking your Samsung device using Dr.Fone – Screen Unlock (Android), you will be able to use the device and its features. You can completely remove the old Google account from the device and add a new one. Your Samsung device can now be used without any limitations.
Part 2: 9-Stepped Procedure of Bypassing FRP on Your Samsung Device with Android 11/12
The process of bypassing FRP on your Samsung device is not complex when using Dr.Fone – Screen Unlock (Android). All you need is Dr.Fone installed on your system, a USB cable, and a good internet connection. Before starting the process, ensure that the Samsung device battery is above 50% and is connected to a strong internet. The 9 steps you need to perform to bypass FRP on your Samsung device are below:
Step 1: Open Dr.Fone and select “Screen Unlock” from the interface. On the next window, choose “Unlock Android Screen/FRP.” Make sure that your Samsung device is connected to the internet.
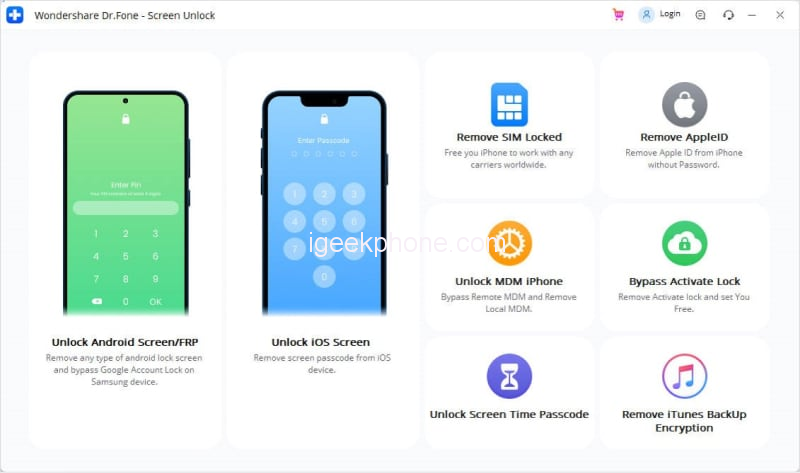
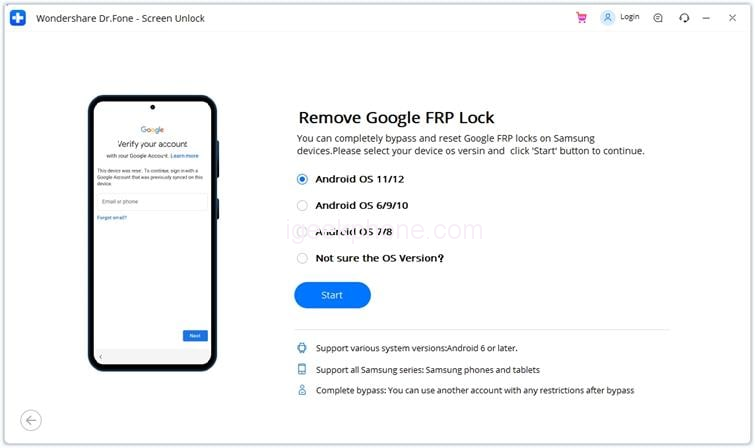
Step 2: Following this, select the option of “Remove Google FRP Lock.” In the “Remove Google FRP Lock” screen, select the version of Android, which in this case is the “Android OS 11/12” version. Following this, you must connect your Samsung device with a USB cable and proceed by hitting the “Start” button.
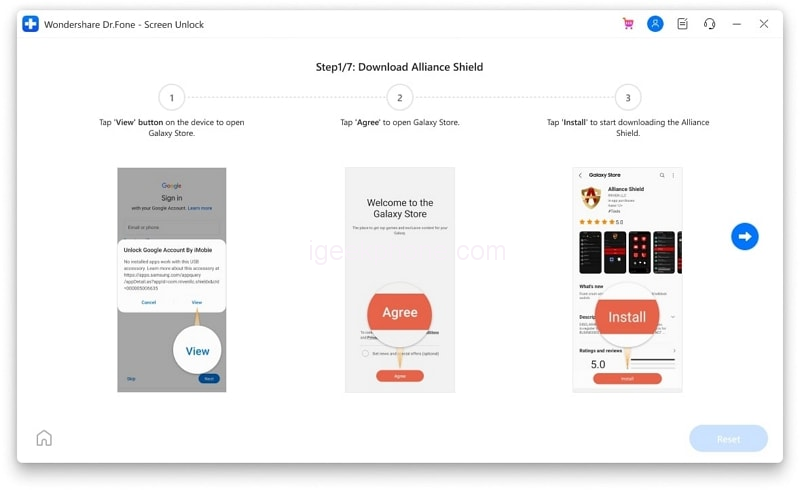
Step 3: A notification is sent simultaneously across the computer and smartphone. Click on “Confirmed!” on the computer and lead to your smartphone. On the smartphone notification, you will find the “View” button redirecting you to the Galaxy Store. Click “Agree” across the Store to install an application on your Samsung. Access the “Alliance Shield” app on the Galaxy Store and click on “Install.”
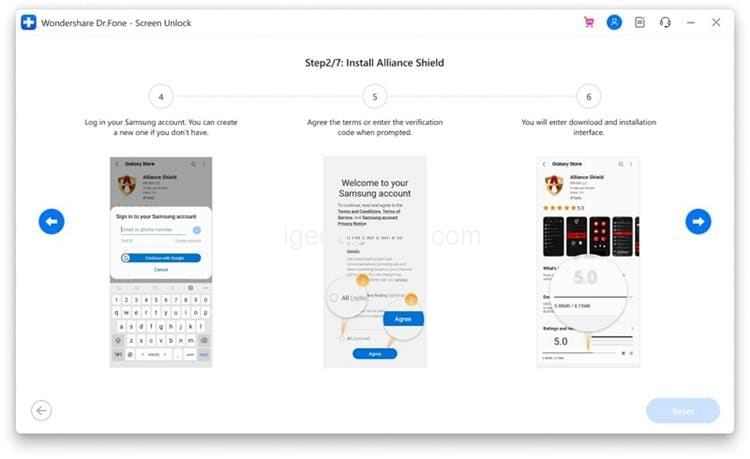
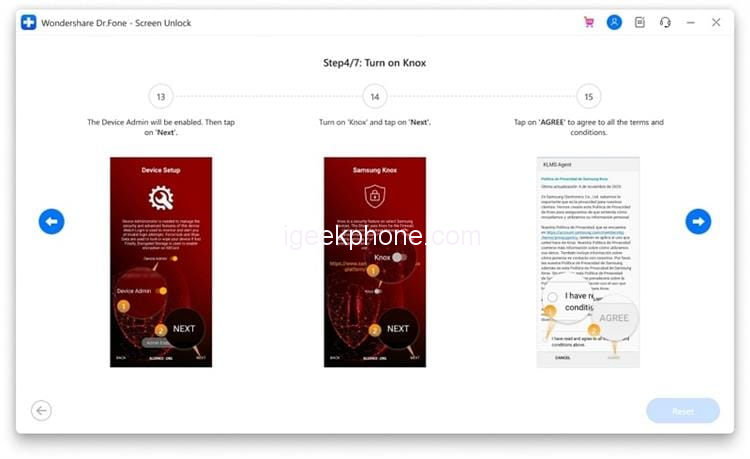
Step 4: Installing Alliance Shield on your smartphone requires you to create or log into your Samsung account. While logging in, you will be redirected to a new window with a set of terms and conditions. Click on “Agree” and let Alliance Shield install on your device.
Step 5: Launch it once installed by clicking on “Open.” You will have to log into Alliance Shield to use it to bypass the FRP lock. Create an account across your computer for this purpose. Lead to “alliancex.org” within your browser and sign up with a new account. Using the same account credentials, log into Alliance Shield on your Samsung device.
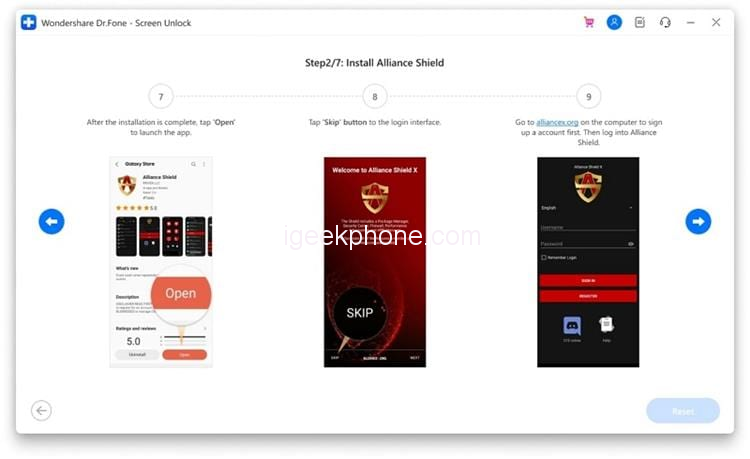
Step 6: Name your device after signing in and lead to activate the “Device Admin” options across the tool. As you turn on the toggle, click “Next” to proceed to the next page. Click on “Activate” and continue with the process. Following this, turn on the “Knox” option on Alliance Shield. As you turn on the toggle, find yourselves on a new page where you must click “Agree” to ratify this step.
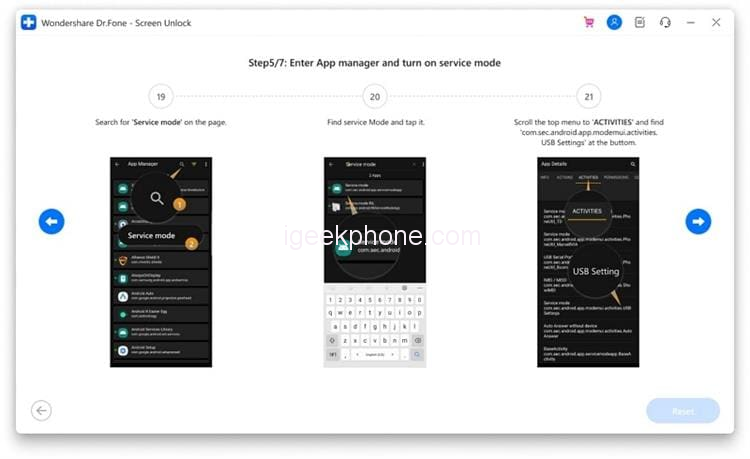
Step 7: On successfully enabling “Knox,” click on “Next” and select “Finish” to configure Alliance Shield. Once done, select “App Manager” from the options and search for “Service Mode” using the search bar. Go through the “Activities” tab and locate the “com.sec.android.app.modemui.activities.USB Settings” option.
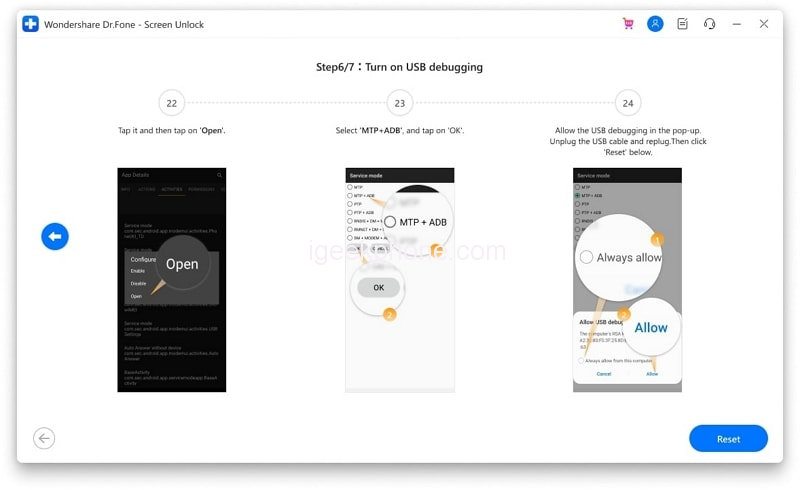
Step 8: While selecting the option, a pop-up will open where you need to select “Open.” Checkmark the “MTP+ADB” option and proceed. You will have to enable USB Debugging, which will appear across a new pop-up. Unplug your Samsung and connect it again to your computer with the USB cable.
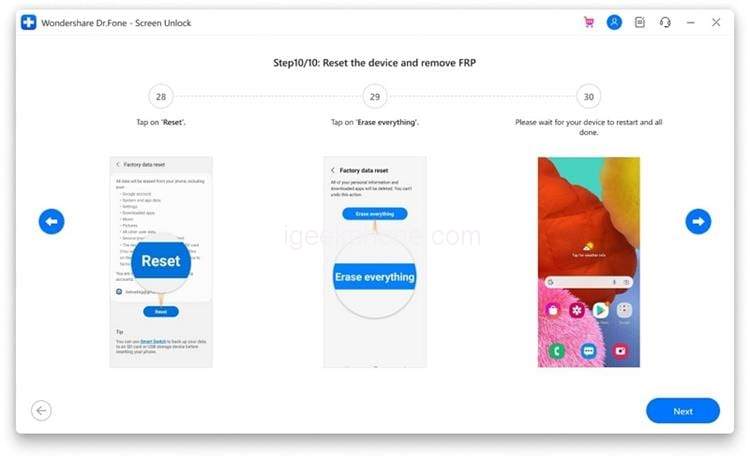
Step 9: Restart your Samsung and lead to its “Settings” after re-launching it. Move to “General Management” and click “Reset” to factory reset your device. Select “Factory data reset” and proceed with the on-screen instructions to conclude resetting your Samsung. Once done, the Samsung device is successfully FRP bypassed.
Part 3: Other Benefits of Using Dr.Fone – Screen Unlock (Android)
Dr.Fone – Screen Unlock (Android) provides many other features and benefits. Aside from FRP lock, these are a few of its significant benefits:
- Apart from FRP, it can open 4 types of screen locks, including PIN, pattern, password, and fingerprints.
- When it comes to FRP, aside from Android 11/12, it also provides bypass FRP services on Android 6/9/10 and Android 7/8 on Samsung devices.
- The interface is simple and easy to understand. Beginners and non-tech-savvy persons can use it without any issues.
- It can unlock Samsung and LG mobile devices without losing phone data.
- More than 15 brands and 2000+ devices are supported by Dr.Fone – Screen Unlock (Android).
Conclusion
Since newly released smartphones by Samsung are usually expensive, most people buy secondhand devices later. You can be a business person who deals in secondhand Samsung phones. When dealing with secondhand mobiles, FRP lock can be a big problem. Dr.Fone – Screen Unlock (Android) is a perfect solution for this problem and can greatly help you.


